Creating New Database Entity Views
| Status: | Published |
|---|---|
| Version: | 1.0 |
| Authors: | Hornbill Support |
| Applies to: | Supportworks ITSM x.x |
Database Entity Views on the Supportworks client provide another means of searching for managed entities such as customers and assets. They are accessed from the client’s shortcut bar, and are available to any of your users. Examples include Customers, Organisations, Search for Requests and Knowledgebase menu items that are found on the left hand side of the client.
To add a new database entity view, follow these steps:
In the Data Dictionary Editor, choose Database Entity Views and click on File > New > Database Entity View menu option and, at the prompt, enter a name such as “Search for Customers”. An item representing your new database entity view appears under the relevant category, and you will notice, on the right-hand side, that most of the attributes of this item are empty. Set the Table attribute to point to the swdata table you want to search on – in this case, userdb. Set the Search Title attribute to “Search for Customers”. Now, you need to create the search-criteria fields for the view. These are the fields into which your users will be able to enter search text, against which results will be returned. When you click on the Search Columns attribute field’s button, the columns from the userdb table are presented to you. Add the following columns as the ones to be included:
keysearch firstname surname site email
Now, you need to specify the Search Result Columns for the view. These are the columns that will be shown in the result list of records that match the search criteria. An important condition here is that you include the primary key column of the search table. In this example, userdb is the search table, so the primary key column is keysearch. Select the following columns for inclusion in the results display:
keysearch firstname surname site telext email
Set the Default Search Option to either “Any search fields match” or “All search fields must match”. The latter indicates that, for any search, only those records whose column values match all of the values entered into the search criteria will appear in the results. Note that your selection here will just be the default setting: the analyst conducting the search will still be able to choose between the two. The Search Filter attribute allows you to filter the returned data. For example, you could specify that you only want records relating to customers at Head Office. You would do this by typing the following into the filter field (without the double quotes): “location = ‘Head Office’ ”. However, for the purposes of this exercise, you can leave the field blank. Save your changes and close the Data Dictionary Editor.
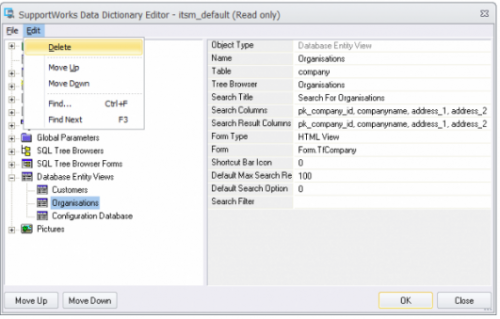
If for example you want users of a new installation to search for customers but not assets or organisations, you can remove the Database Entity Views using this method:
Using the menu Administration > Edit Current Data Dictionary > Display Database Entity Views. Select the entity you are interested it, select the menu Edit on the top and Delete.
These action would remove the option to search for by organisation or CMDB on the left hand side. However you can still search by organisation from the File menu.
