Migrating or Cloning the Supportworks Server
| Status: | Published |
|---|---|
| Version: | 1.2 |
| Authors: | HTL QA |
| Applies to: | Supportworks ESP |
Migrating or Cloning the Supportworks Server
This document contains instructions on making a copy of your Supportworks server on another machine, for the purpose of either creating a development/test system to run alongside your live system, or migrating your live system over to the new machine completely. The procedure basically entails carrying out a "clean" installation of your existing version of Supportworks on the target server, and then copying over to it all the files containing your data, your system configuration, your customisations and any other files that will have changed since the original installation.
If you wish to migrate from one version of Supportworks ESP running on one machine to a newer version running on another machine (for example, if you want to upgrade initially on a test/development server), you should first carry out the migration detailed below and then only afterwards perform the upgrade on the target machine. Attempting to migrate directly from one version to another will only lead to difficulties and is definitely not recommended.
Please Note: Before proceeding with the instructions below, you will need to have obtained a copy of the Server Transfer Request Form or the Test Server Request Form (as appropriate) from the Product Downloads page of the Hornbill SelfService website and to have returned it with the requested information filled in. This information allows Hornbill to issue you with a licence key that will be valid on your new server.
The recommended procedure for copying a Supportworks server is as follows:
- Download the same version of Core Services and Supportworks as you have on your live system now and install them on the target machine. Note that if this version is not available, you should use the nearest one.
- On both the old and the new server, run the Supportworks Server Configuration utility and, on the Server tab under Installed Services, stop all of the services, starting at the top.
- On both the old and the new server, stop the SwSqlServer and SwHTTPServer services from the Services utility accessible via the Windows Control Panel.
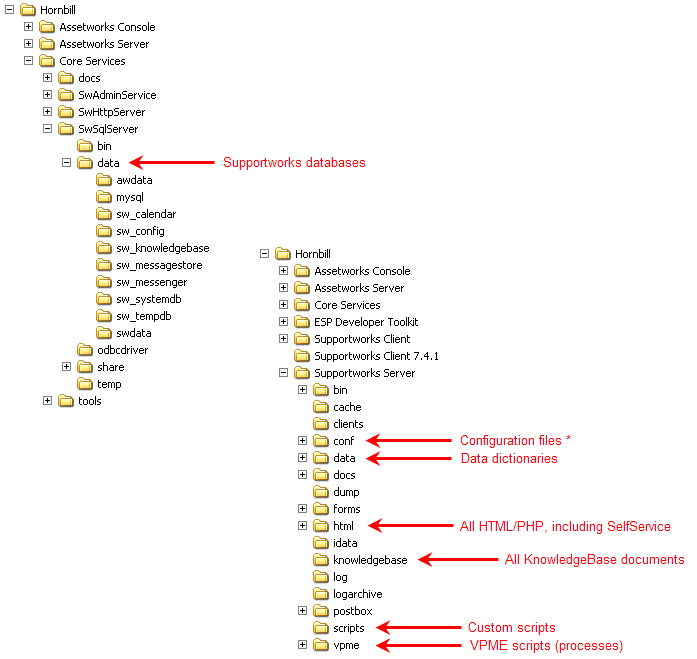
- With reference to the figure below, copy and replace the contents of the six (or seven*) indicated folders from your old to your new server. (Note that the installation path would normally be C:\Program Files\Hornbill, but this may be different on your system.)

- * Unless you have installed the server to the same path on the new machine as your previous server, using exactly the same credentials and settings, copying the \conf folder may cause your server to function incorrectly. We would recommend that you suitably reconfigure the default settings installed with Supportworks rather than copy the original configuration files from your old server.
- On the new server (and on the old server, if this will continue to be your live system), start the SwSqlServer service from the Services utility accessible via the Windows Control Panel.
- On the new machine, you will now need to drop the table swdata.swsystag, which will ensure that there is no system ID mismatch when you start the main server. If you are using SwSQL as the database, you can drop the table by typing the following command line, using the Interactive SQL utility supplied with Core Services:
DROP TABLE swdata.swsystag;
- On the new server (and on the old server, if this will continue to be your live system), start all services by means of the Supportworks Server Configuration utility, starting from the bottom up.
- On the new server (and on the old server, if this will continue to be your live system), start the SwHTTPServer service from the Services utility accessible via the Windows Control Panel.
Your new server should now be fully functional. If you are migrating to that server, you can now decommission (uninstall) your former live server.